Showing posts with label blogspot. Show all posts

Friday, June 15, 2007

If you are serious about Blogging start with Wordpress

If I had my time again I would definitely have started out with Wordpress as the platform, I have a couple of other Blogs that are Wordpress and I really recommend it. The problem for me now is with over 300 posts on this site and so many links etc everywhere it becomes extremely difficult to move.

I was watching a video by Yaro today who did a Blog Case study on a Blogspot Blog and that was about the first thing he said. You might like the video especially if you are just embarking on your Blogging career. (its probably more aimed at beginners this video, but still full of good tips ).

Hosting is so cheap these days and wordpress is free with some great themes and plugins. Theres really no excuse, unless you are not sure that you will stick at it for long and are just testing the water.

Also I am now selling post level text link packages for $10 US dollars each. You may want to try this on your own blog as a way to extract a little more out of every post. Basically for 10 US dollars you get 4 links with the anchor text(s) of your choice. (the links will be spread over 4 posts and will be at the bottom of the post) . If you like you can check out our advertising page for more info.

Happy Blogging

Rob

Subscribe by Email to the Million Dollar Experiment Down Under

Your link here $10 for 4 links (1 link X 4 posts)

You Comment and I follow

Monday, June 04, 2007

How to Remove No Follow from Blogspot Comments

Finally I have decided to remove the no follow tag from my comments, the no follow tag is added by default in Blogspot blogs so that all the spam comments are not indexed. I personally moderate each comment myself so spam won't be an issue for me or for Google from this blog. I found the information to do this from this post Removing NoFollow from Blogger styled layouts however have tried to break it down into five basic steps - its a good idea to back up your template before carrying out any modifications to it.

5 steps to remove from your template

1./ Click on Layout for the relevant blog in your blogspot template

2./ Click on Edit HTML

3./ Tick the expand widgets box and do a search for nofollow

4./ Delete the line that says rel = 'nofollow' there were two of them in my template, one for back links, one for comments. I just removed the one for comments. (this is the one that has the code next the line comment.author)

5./ Save Template

Why did I remove it?
Basically I have removed the nofollow tag to provide more value for visitors to this site - its an incentive that will hopefully result in more comments on my posts. Part of what convinced me to do this was this post Never See "0 Comments" On Your Site Again...Guaranteed!

I will post a future article on the effect that this has on my blog comments, remember if your comment is not related to my article and just a plug for your own site it will not get displayed anyway - all authentic comments will get displayed.

Subscribe by Email to the Million Dollar Experiment Down Under

Tuesday, April 24, 2007

How to add a Favicon to your Website or Blog

Have you ever seen the little icons that some sites have in the address bar and wished that you could have one for your website or Blog? Well now you can. This article will explain how to create a Favicon easily online and how to add it to your website or Blog. We also have a special set of instructions for Blogspot (Blogger) blogs.

How to create a Favicon
Firstly you need to create the little .ico file that will be used on your site. I have a favourite online site that I use for simple text favicons and that is what we will use today. Of course you can also create your own graphic and use that instead.

Head to the site Favicon Generator and enter the text or initials that you would like to use. Of course space is an issue however for our favicon we are going to use One at the top and Mill at the bottom. For the border and the background we will use the colours from this blog. (to get the colours from your website or blog it is very simple if you use the colorzilla plugin for Firefox. )

Have entered the words, just need to add the colors
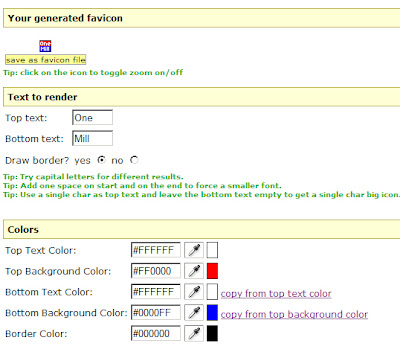
Now with the colorzilla firefox plugin it is just a matter of hovering the mouse over a color on your page and it will tell you the html code for it - very cool tool. Once I have added the colors it is now time to download the favicon.ico file and I will just save it on my desktop for now. It is important to rename the file before or after you save it otherwise it will not work on some sites that already have a favicon.ico file. I am going to call mine onemill.ico

Applying the color combinations to the favicon.
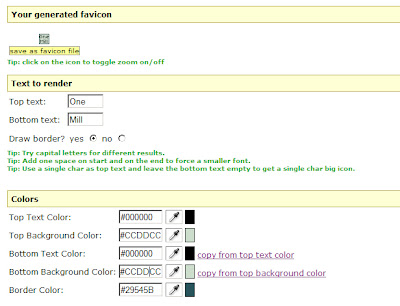

Ok if you have followed the process so far you now have a little ico file saved on your computer. Now there are two sets of instructions, first set is for those with a regular hosted website where they can upload this file via ftp to their site.

Regular Website or Blog - Hosted on your own Domain
Using your ftp or file transfer program transfer the favicon.ico file to the root directory. Now on every page that you wish the favicon to show (normally included in the header file for your pages) add the following code. This should be directly after the head tag. (favicon.ico should be replaced with whatever you called your ico file. If it is your own domain the name favicon.ico may also work ok.

Blogger/Blogspot Hosted Blog
If you have a blogspot blog like I do we need to first find a home to host our favicon icon. I use the http://pages.google.com option because its free fast and easy. Head to the site manager and upload your favicon. My address for my favicon is http://robstgeorge.googlepages.com/onemill.ico . Now we need to dig into our Blog template and add the code that will point to this file that we have uploaded.

If you prefer to cut and paste here it is, however you will need to remove the spaces around the <> signs.

< href="'http://robstgeorge.googlepages.com/onemill.ico'" rel="'shortcut">
< href="'http://robstgeorge.googlepages.com/onemill.ico'" rel="'icon'/">

Now after you saved that you can refresh your browser and chances are you may not yet see it! Favicons are funny things and if a new visitor arrives at your site, they will see it, however you may need to remove any bookmarks you have to the site and clear any caching of temporary internet files before you can see it. You may want to try it on another computer or another browser just to check your work.

The finished sample...

I hope you found this tutorial of value, please feel free to link to it if you would like to share it with the readers of your blog. You can subscribe with the link below if you would like regular articles like this sent direct to your email account.

Subscribe by Email to the Million Dollar Experiment Down Under


1. Mike's Money Making Mission
2. Kumiko's Cash Quest
3. How to earn money online?
4. Stratz's Blog
5. Hot Blog Girls

Job Search Australia
Job Search New Zealand

Sunday, April 22, 2007

Blogspot Title Tags how to Remove Blog Name from the Beginning

The theory of Title Tags we are discussing applies to all websites and Blogs, we show how to fix this behaviour in the Blogger Templates, however if you use Wordpress here is a great little SEO Title Plugin that you can use.

You may have noticed that when you post an article via your blogger dashboard the default title tags append the Blog name to the front of the title. This means that if you have the title "5 ways to Make Money Fast" the actual title as the search engines see it will be...

The Million Dollar Experiment heads Down Under: 5 ways to Make Money Fast

"So what" I can hear you saying - well the facts are that search engines take the title tags very seriously indeed, and they start at the beginning with the first few words being the most important ( or supposedly most relevant ) and then it drops after that as I have illustrated below.

So as you can see we are wasting most of our prime real estate with the title of our Blog and unless you are really famous it is highly likely that any search's that are going to be relevant to your site are more likely to be picked up in the title of your actual Post so we are going to change our Blogger template so that this comes first and the Blog name second.

How to change the Blogger Template to Show title of Post before Blog name on Single Posts
We need to edit the template so head into your Blogger dashboard and click on template then edit html to get access to the code that we need to change. Once you are in there you need to follow the instructions on this post Changing the Blogger Title Tag. All it involves is cutting and pasting some new code.

It worked for me, check out how the title now sits...


How to change the Title of your Main Page
Now this may seem so obvious that its ridiculous however what are the key words that you are using in the main title of your blog... all I had was The Million Dollar Experiment Down Under. Now this was great for people searching for the "million dollar experiment", I was ranking 2nd only to Steve Pavlina for that - however not to many people really search for that on a daily basis. So I have now added the keywords that I am concentrating on to the beginning of the Title. If you look at the main title of my page now it reads Make Money Fast - The Million Dollar Experiment Down Under.
To change this yourself go into the blogger dashboard click on Settings , then Basic and simply add in your keywords to the title of your Blog.

I would advise that you give it a shot, it can only help the search engines pick up on what you are really writing about. Make sure that you back up your template first!

Subscribe by Email to the Million Dollar Experiment Down Under


1. Mike's Money Making Mission
2. Kumiko's Cash Quest
3. How to earn money online?
4. Stratz's Blog
5. Hot Blog Girls

Job Search Australia
Job Search New Zealand